- Stenciling (Part 1) -
How to create your own stencil
What you need to make stencil:
- Clear plastic sheeting
- Cutting tool/X-acto knife
- Cutting surface/self healing cutting mat
- Tape
- Printout with pattern or paper to draw your own design
1. Choosing Plastic SheetingThere are many materials a stencil can be made out of including paper, cardboard and old folders. If you plan to reuse the stencil or use it with paint, the best material is plastic. You can wash it off when the paint gets too thick, it's sturdy, and will create cleaner edges. It's also available in clear, which allows you to see the pattern through it as you cut out the design. This also helps with continuous patterns while painting, allowing you to line up the pattern as you move it along the wall overlapping the new position with already painted sections.
Craft plastic (or mylar or acetate) comes in a variety of sizes and thicknesses ranging from 3 mil to 12 mil (.003"-.0012"). Even thicker sheeting is available, but can be difficult to cut. Thicker plastic will be more sturdy, while thinner is easier to cut through. Choose clear plastic in the size and thickness that's best for you.
For my project, I chose 12x12 inch, 7 mil clear plastic by Grafix. It came in pack of 25 sheets with tissue paper separating the sheets. This came in handy to draw the pattern on since the paper was also 12x12 and easy to see through for tracing.
2. Find or Create a Pattern
You may find scrapbook paper or wrapping paper you want to scan into the computer, adjust the size, and print out. Keep in mind if you start with a design with multiple colors you will either need to change the image to black and white or create a multi color stencil by separating each color and cutting a stencil for each layer of color you'll be applying to the wall. Also, take a close look at the pattern you've selected. If you have solid sections that will cause the stencil to fall apart when you cut it, you can fix the problem by adding small bridges connecting those sections as needed. If you don't like the look of the bridges after painting it, you can go back with a small brush and touch up those areas by hand.
 |
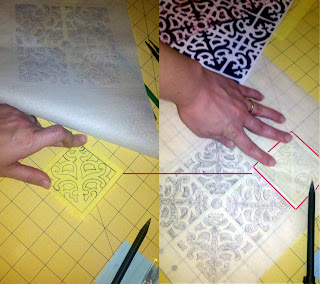
| Each time I positioned the square, I rotated it 90 degrees before tracing. |
For my project, I measured out the size I wanted on grid paper, cut out that square, then folded it diagonally in half. I drew half the pattern on the folded paper, then flipped it over and traced what I'd just drawn onto the backside. Once unfolded, this ensured I had a perfectly square, proportional pattern. I then placed it under my 12"x12" tracing paper using the grid on the cutting surface to line up the square with the paper and trace it. Each time I retraced the square, I rotated it 90 degrees creating a more interesting larger design. The final pattern was exactly what I wanted. It was based on fabric I saw in a magazine. Since it was a fabric print, it wasn't perfectly aligned which is why I redrew it.
If you have a machine, such as cricket, you may be able to find images you like and allow the machine to do all the cutting for you. This would be the easiest and quickest method, but make sure you select plastic sheeting that's compatible with your machine.
3. Prepare to Cut
Once you have chosen a pattern and adjusted the size to your liking, tape the paper down to the surface you'll be cutting on. Then overlay plastic sheet on pattern, centering the image to leave a blank border on all four edges to protect against painting outside the lines. Tape all four corners of plastic down securing it to the cutting surface.
4. Cutting Stencil
Be careful! Razor blades are very sharp and can easily slip causing you to cut yourself. Keep fingers out of the line your cutting toward and try to maintain a downward pressure to minimize slipping of blade. I found standing above my stencil while cutting allowed me more control than sitting in front of it. Cutting the plastic is a major pain, especially if it's intricate! So, stay patient, take lots of deep breaths, and take your time.
Process
1. Tape down paper pattern.
2. Position plastic over pattern. Tape down.
3. Carefully cut plastic sheet.
4. Trace pattern along edge of plastic to help you line up the pattern as you reposition it on the wall to continue pattern.
Tip: For straight lines, you can use a ruler to help you maintain a straight cut.
Tip: Move blade slowly, maintaining downward pressure as opposed to pulling blade the direction you want it to go. When you start applying force in any direction, the blade can move very quickly going further than you intended.
Tip: You may find it easier to lightly trace section with blade, then make final cut on second time following the track you just created.
Tip: Uh!Oh! If you cut too far, you can use a small piece of tape to hold the plastic together.
Once you start painting, the paint should act like a layer of glue keeping it together.
4. Finishing Touch
Using a permanent marker, Trace the pattern along the edges where you left a blank border. This will allow you to overlap and line up edges with the last section painted on the wall keeping everything perfectly placed. Careful... The marker can still rub off the plastic. Consider tracing it on both sides of plastic in case one side rubs off.
Part 2 - Painting with Stencil - Soon to come

No comments:
Post a Comment
Note: Only a member of this blog may post a comment.